Sunday, 26 July 2015

The Fairy Godmother (2015) - Part 3


Welcome back!

My next task was creating the ruff. Again, this was a completely new experience for me. I started by creating the main section of frame work by bending wire in the desired shape. I made sure to leave a few inches at each end to tuck into the top of the bodice. I used masking tape to keep the pieces in place until I decided on the final design.


I added the wire around the neck edge and added smaller pieces of wire in between to both support the frame and create a design. Some were straight pieces and other were bent in the middle.


I then used thread to tie the connecting wire sections which were later glued to secure. I cut off the excess edges and finally had a finished frame!


I sprayed the frame white and added the fabric. Each layer had to be hand stitched around the frame edge. I used iridescent organza, crystal organza (with the holes in) and a free standing layer of spider mesh. The was only attached at the lower edge. I also used some of the crystal organza on the back of the ruff, which was folded at the edge and hand stitched. 


The entire ruff took a total of around 7 hours work, due to all the hand stitching. Once it was complete, I added some Swarovski crystals.


On to the wings!

This was a similar process to the ruff. I created the wire frame first in 4 separate sections.


Again, they were sprayed white and covered in iridescent organza and crystal organza on the front and back (with holes burned into the front). After the tedious amounts of hand stitching, more Swarovski crystals were added and they were complete! I didn't add them to the bodice until later...

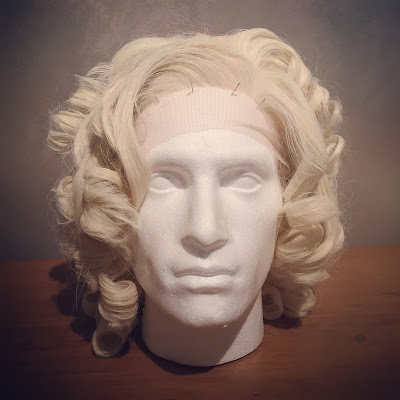
I then looked at the wig. I bought this wig from WigIsFashion as my base. It was a little too long and the curls weren't tight enough but it could be fixed! This was my wig when it arrived...


I started by cutting it to length and creating the far side parting. I used heated rollers in the smallest size. Sadly I only had 6 rollers in this size so curling took a while...thankfully I had Netflix and Once Upon A Time to keep me going.


Once the entire wig was curled, I sprayed it with some dry shampoo, as the colour was a little too 'yellow'. I then sprayed as much hairspray as it could take (I used Got2B Freeze Spray - the yellow one! It's amazing!). This was the result.


I added Swarovski crystals to the entire wig and it was complete and ready for wearing!

I then went back to finishing the bodice. I added the piping along the bottom edge of the bodice and hand stitching the hem in place. I was originally going to use a zipper for the back fastening, however I decided to opt for a lace up back for a nicer fit. I created a modesty panel and added silver grommets to the bodice edge. I used a silver cord for lacing. Sadly I have no pictures of this, as time got the better of me as the LFCC approached. 

To insert the wings, I created 4 buttonholes on the back of the bodice. Each wing section was inserted and stitched on the inside in various places. I also added a couple of stitches to the outside to secure the wings, as they became a little top heavy. Personally, if I was to do this again I would create another option for attaching the wings. I really wanted them to be 'hidden'.

Swarovski crystals were added to the entire dress too. It's so sparkly!


As you are unable to see her shoes in the movie (except for a split second if you can pause that quick! And even then, they're in the dark!), I had to make a creative decision. I opted for pure white Victorian style leather boots. So cute!


I also did a small make up and wig test. I used a dark purple shadow around the crease of the eye, black eyeliner and lots of mascara. I also used false lashes on the outer edges on the day. Depending on your reference pictures, she wears two different lip colours. In promotional images, she wear a deep plum colour and in the movie it is more of a pale coral. I opted for a pale coral gloss. I also bought some diamante earrings from eBay. I searched for days and days to find something close to hers and finally decided on some that only cost me £2.99! I also bought some diamante hair pins for eBay, which unfortunately you can't see in this picture. They were stunning and super sparkly!


And the dress was finished! Here is the final result.


(Yeah, that's OUAT on in the background again...it has been my rock)

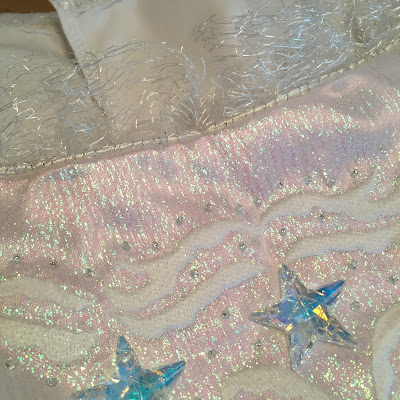
And here is a closer look at the bodice details...


Then it was off to LFCC for the Championship Masquerade with Ella (otherwise known as Ashleigh)!


And here is the dress complete on on! (Ella's dress was also created by myself, with the butterflies and crystals done by Ashleigh. I must say, I am NEVER creating anything blue again. Trying to match colours was a nightmare!)


And here you can see our small performance at the masquerade. Please watch the entire video, as there are some beautiful cosplays. Panterona Cosplay as Akasha was the much deserving winner (she still gives me goosebumps!) and the amazing Chameleon as Daenerys, who recited an entire speech in High Valyrian, was runner up. Unfortunately, on this video, you can't appreciate entirely the detail on both of these cosplays but they were stunning.

I hope you have enjoyed following my process for this costume. If you have any questions at all, please ask!

I am currently in the process of researching my next cosplay for NFCC Winter 2015 - Snow White (OUAT Season 2). Obviously all of that re-watching has left it's mark...

Toodles! :)


Saturday, 25 July 2015

The Fairy Godmother (2015) - Part 2

My next task was creating the piping for the edges of the bodice and for in between the centre panel and the side front panels. This was my first time even using piping so it was entirely new experience. Thankfully I came across a fabulous tutorial by Jennifer Rosbrugh. It was so helpful!


I used strips of satin (cut on the bias) and the spider mesh and pinned cord in the middle. I would highly recommend buying a piping foot for your machine - a genius little contraption! After stitching the cord into the piping, I hand stitched silver thread along the entire strip. This was placed between the centre panel and the side front panels. I then stitched together the other bodice pieces and pressed the seams as normal.

Before

After


I then cut a long strip of spider mesh and heated the edges on one side with a lighter (be careful!). This was gathered and attached to the top of the centre panel. You can also see the detail of the piping here, which was also added to the top edge of the centre too.


I cut large sections of spider mesh for the flounces. Again, the edges were burned and then gathered and pinned between the sleeve and sleeve lining. Everything was pressed before being attached to the bodice. 


I also hand stitched small iridescent stars into the flounces.


I actually left the piping on the lower edge and the fastening at the back of the bodice until later. From here, I moved onto the skirt...


I created the underskirt first (using the Simplicity pattern). The side and back panels were white poly cotton and the front panel was white satin, iridescent organza and then a top layer of a thicker crystal organza. This panel needed to be less 'shiny' than the rest of the dress and the fabric used in the original dress had a 'bubble' effect pattern. This fabric would help in creating that. 

Now the next part was tedious to say the least. Please, please be extremely careful if you intend to use the same technique for this next section. I had to burn holes in the top layer of fabric. I tested a few methods, one being with a soldering iron, however the fabric ended up melting to the iron and later leaving black marks. My only reliable method was by using a lighter. I used a glass surface to work on and cut off any 'brown' pieces with small thread scissors.


This was the end result:


It's a lot easier to make out the design in person.

Next was tulle...and lots of it.


I cut very long lengths and folded them in half lengthways, The edges were overlocked and pinned into place on the dummy. The tulle had to start at one side of the front panel of the underskirt and end at the other. I cut a slit down the back for getting this on and off and attached it to a waistband with ties and the back.


I spent this entire process saying 'IT MUST BE BIGGER!'.

Next was the overskirt. I cut two large sections of satin, iridescent organza and spider mesh, stitched a centre back seam (up to a certain point for getting on and off) and draped them onto the form. Once pinned and gathered, they too were added to a waistband with back ties. The front edges were all overlocked and hemmed by hand. I added a few tacking stitches in various places to creating the 'poofyness' of the skirt. When looking at reference pictures, you can see that her skirt is not straight up and down.


I left the lower hem until later, as I still hadn't decided on what shoes to wear. 

My next post will look at the ruff construction and wings. 

Toodles! :)


Wednesday, 22 July 2015

The Fairy Godmother (2015) - Part 1

So after being privileged enough to be placed first in the Newcastle Film and Comic Con Cosplay Regional Qualifier Masquerade with my Drusilla from Buffy the Vampire Slayer cosplay, part of my prize was a reserved spot in the Championship Masquerade at London Film and Comic Con in July this year. My partner in crime, Ashleigh and I, decided to compete as a pair again and our choice of cosplay was the Fairy Godmother and Ella from Disney's live action remake of Cinderella. This blog will look at how I constructed the costumes and hopefully give you helpful tips for your own cosplays. So, here it goes...


I started with Simplicity 4092 as a base. The bodice seemed to be the closest and would need the least amount of altering. The skirt, however, would need a little more. My fabrics were a white liquid satin (it didn't matter too much for quality, as this was more of a base for the colour), iridescent pearlised organza, white spider mesh and white polycotton for lining. 

This would be the final result of all the fabrics together:

I then followed the pattern instructions for the bodice (totally ignoring the skirt for now!). For the central panel, the spider mesh wasn't needed. 

Each section was then overlocked and ready to be sewn together.


My next challenge was recreating the embroidery design on the front panel of the bodice. I started by sketching it by hand and scanning it into Adobe Photoshop. I then redrew the design in Photoshop and cut it into five individual sections. Each section was transferred into PE Design Plus and uploaded to my embroidery machine. (The greatest investment ever!)


As the fabrics were quite delicate, I used an iron on stabiliser on the back of the panel. This also allowed for no hoop burn on the fabric. I also used a water soluble stabiliser on the top. I decided to use white embroidery thread, as I thought I fit my fabric choices better. If I was to do this again, I may be inclined to opt for the light gold. This was the result:


I then added Swarovski stars onto the design. I used a clear thread to secure them. Look at those sparkles! 


I then hand stitched tiny silver beads across the entire piece. This would later be filled in with Swarovski crystals too.


In part two, I will explain the process of piping and finishing of the bodice. 

Toodles! :)


Saturday, 4 July 2015

Welcome!

Hi everyone and welcome to my first ever blog!


My name is Emma and I live in the North East of England. I've been cosplaying for around 10 years but it has taken on a more dominant role in my life over the past couple of years. I spend the majority of my free time creating costumes now and hopefully I'm improving with each one!

I decided to create a blog to share the processes and techniques I use when creating my cosplay. Research is one of the most time consuming aspects of the process. We have a bit of a love/hate relationship. There's nothing more exciting than beginning your research for a new project, however when you find yourself researching the same thing 3 weeks later, the word 'tedious' springs to mind. I found that looking at the processes that other cosplayers used to create their work is a massive help (and inspiration!). This blog will hopefully show you the techniques I've used and adapted and maybe even some useful links to various other sources that prove more than useful with certain projects.

I'm currently in the process of creating two pieces for London Film and Comic Con in 2 weeks time. Over the next couple of weeks I will share with you what I have created so far and wish all of you luck in any future projects you are creating. Watch this space!